Notification Behaviour
So far we’ve looked at the options that alter the visual appearance of a notification. There are also options that alter the behaviour of notifications.
Be default, calling showNotification() with just visual options will have the following behaviours:
- Clicking on the notification does nothing.
- Each new notification is shown one after the other. The browser will not collapse the notifications in any way.
- The platform may play a sound or vibrate the user’s devices (depending on the platform).
- On some platforms the notification will disappear after a short period of time while others will show the notification unless the user interacts with it (For example, compare notifications on Android and Desktop.)
In this section we are going to look at how we can alter these default behaviours using options alone. These are relatively easy to implement and take advantage of.
Notification Click Event
When a user clicks on a notification the default behaviour is for nothing to happen. It doesn’t even close or remove the notification.
The common practice for a notification click is for it to close and perform some other logic (i.e. open a window or make some API call to the application).
To achieve this we need to add a ‘notificationclick’ event listener to our service worker. This will be called when ever a notification is clicked.
self.addEventListener('notificationclick', function(event) {
  const clickedNotification = event.notification;
  clickedNotification.close();

  // Do something as the result of the notification click
  const promiseChain = doSomething();
  event.waitUntil(promiseChain);
});
As you can see in this example, the notification that was clicked can be accessed via the event.notification parameter. From this we can access the notifications properties and methods. In this case we call its close() method and perform additional work.
Remember: You still need to make use of event.waitUntil() to keep the service worker running while your code is busy.
Actions
Actions allow you to give users another level of interaction with your users over just clicking the notification.
In the previous section you saw how to define actions when calling
showNotification():
    const title = 'Actions Notification';
    const options = {
      actions: [
        {
          action: 'coffee-action',
          title: 'Coffee',
          icon: '/images/demos/action-1-128x128.png'
        },
        {
          action: 'doughnut-action',
          title: 'Doughnut',
          icon: '/images/demos/action-2-128x128.png'
        },
        {
          action: 'gramophone-action',
          title: 'gramophone',
          icon: '/images/demos/action-3-128x128.png'
        },
        {
          action: 'atom-action',
          title: 'Atom',
          icon: '/images/demos/action-4-128x128.png'
        }
      ]
    };

    const maxVisibleActions = Notification.maxActions;
    if (maxVisibleActions < 4) {
      options.body = `This notification will only display ` +
        `${maxVisibleActions} actions.`;
    } else {
      options.body = `This notification can display up to ` +
        `${maxVisibleActions} actions.`;
    }

    registration.showNotification(title, options);
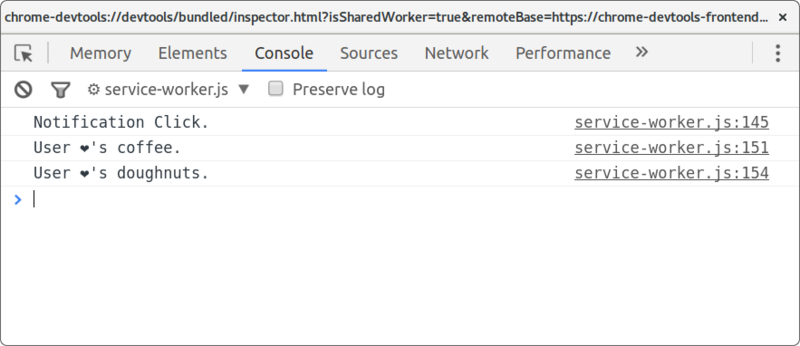
If the user clicks an action button, check the event.action value in the noticationclick event to tell which action button was clicked.
event.action will contain the action value set in the options. In the example above the event.action values would be one of the following: ‘coffee-action’, ‘doughnut-action’, ‘gramophone-action’ or ‘atom-action’.
With this we would detect notification clicks or action clicks like so:
self.addEventListener('notificationclick', function(event) {
  if (!event.action) {
    // Was a normal notification click
    console.log('Notification Click.');
    return;
  }

  switch (event.action) {
    case 'coffee-action':
      console.log('User ❤️️\'s coffee.');
      break;
    case 'doughnut-action':
      console.log('User ❤️️\'s doughnuts.');
      break;
    case 'gramophone-action':
      console.log('User ❤️️\'s music.');
      break;
    case 'atom-action':
      console.log('User ❤️️\'s science.');
      break;
    default:
      console.log(`Unknown action clicked: '${event.action}'`);
      break;
  }
});
Tag
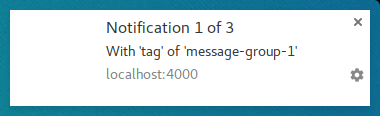
The tag option is a string ID that “groups” notifications together, providing an easy way to determine how multiple notifications are displayed to the user. This is easiest to explain with an example.
Let’s display a notification and give it a tag, of ‘message-group-1’. We’d display the notification with this code:
    const title = 'Notification 1 of 3';
    const options = {
      body: 'With \'tag\' of \'message-group-1\'',
      tag: 'message-group-1'
    };
    registration.showNotification(title, options);
Which will show our first notification.
Let’s display a second notification with a new tag of ‘message-group-2’, like so:
        const title = 'Notification 2 of 3';
        const options = {
          body: 'With \'tag\' of \'message-group-2\'',
          tag: 'message-group-2'
        };
        registration.showNotification(title, options);
This will display a second notification to the user.

Now let’s show a third notification but re-use the first tag of ‘message-group-1’. Doing this will close the first notification and replace it with our new notification.
        const title = 'Notification 3 of 3';
        const options = {
          body: 'With \'tag\' of \'message-group-1\'',
          tag: 'message-group-1'
        };
        registration.showNotification(title, options);
Now we have two notifications even though showNotification() was called three times.

The tag option is simply a way of grouping messages so that any old notifications that are currently displayed will be closed if they have the same tag as a new notification.
A subtlety to using tag is that when it replaces a notification, it will do so without a sound and vibration.
This is where the renotify option comes in.
Renotify
This largely applies to mobile devices at the time of writing. Setting this option makes new notifications vibrate and play a system sound.
There are scenarios where you might want a replacing notification to notify the user rather than silently update. Chat applications are a good example. In this case you should set tag and renotify to true.
        const title = 'Notification 2 of 2';
        const options = {
          tag: 'renotify',
          renotify: true
        };
        registration.showNotification(title, options);
Note: If you set renotify: true on a notification without a tag, you’ll get the following error:
TypeError: Failed to execute 'showNotification' on 'ServiceWorkerRegistration': Notifications which set the renotify flag must specify a non-empty tag
Silent
This option allows you to show a new notification but prevents the default behavior of vibration, sound and turning on the device’s display.
This is ideal if your notifications don’t require immediate attention from the user.
    const title = 'Silent Notification';
    const options = {
      silent: true
    };
    registration.showNotification(title, options);
Note: If you define both silent and renotify, silent will take precedence.
Requires Interaction
Chrome on desktop will show notifications for a set time period before hiding them. Chrome on Android doesn’t have this behaviour. Notifications are displayed until the user interacts with them.
To force a notification to stay visible until the user interacts with it add the requireInteraction option. This will show the notification until the user dismisses or clicks your notification.
    const title = 'Require Interaction Notification';
    const options = {
      body: 'With "requireInteraction: \'true\'".',
      requireInteraction: true
    };
    registration.showNotification(title, options);
Please use this option with consideration. Showing a notification and forcing the user to stop what they are doing to dismiss your notification can be frustrating.
In the next section we are going to look at some of the common patterns used on the web for managing notifications and performing actions such as opening pages when a notification is clicked.